How to create GPT Telegram bot using CustomGPT
Alex Blashchuk | March 18, 2024 | Category: PYTHON-API
**All code written below is for educational purposes.**
While searching for GPT-based tools, I came across CustomGPT service. The service allows you to create your own custom bots using GPT 4 and your own database. Under its database - it means that you can upload any documents with information, such as doc PDF PPTX, as well as there is an opportunity to absorb entire forums and community (pre-prepared sitemap such resources). And this bot will be able to answer questions whose topics are revealed in these documents. If he does not find an answer in them, the bot will answer "Sorry, but I can not answer this question". Of course, if you want the bot to be able to answer even in such situations, you can configure it to work not only with the database, but also with the global GPT. But you have to be careful here, otherwise the correctness of answers and their accuracy drops rapidly. And such bots will give completely different answers to the same question.
As a result, for 100 dollars, we get:
- up to 10 bots
- monetization support
- up to 60 million words in the database. And this for such a price is the most favourable that we could find
- work with GPT 4
- access to OpenAI API
Actually, further, we will talk about working with OpenAI API 😊. Working with a regular bot looks as follows. There is a link with public access (it must be created beforehand) to the bot. This link creates a new communication session where you can ask questions, etc. And here is an important point, your sessions will not be saved like in Chat GPT. Each click on this link will create a new chat session. But don't get frustrated, if you save a past link from the browser search bar, you can get into an existing session. Moreover, you can pass it to a friend, and he will also see your correspondence with the bot😈
So, if you put these links together somewhere, you can get a rough functionality with session history like in Chat GPT and a separate button to create a new session😈 Using Python, OpenAI API, and Telegram API it can be done. For even more simplicity, we will show all of our created chats, but always chat in the last created one. To work, we will need the following libraries:
- Requests - for convenient work with OpenAI API commands
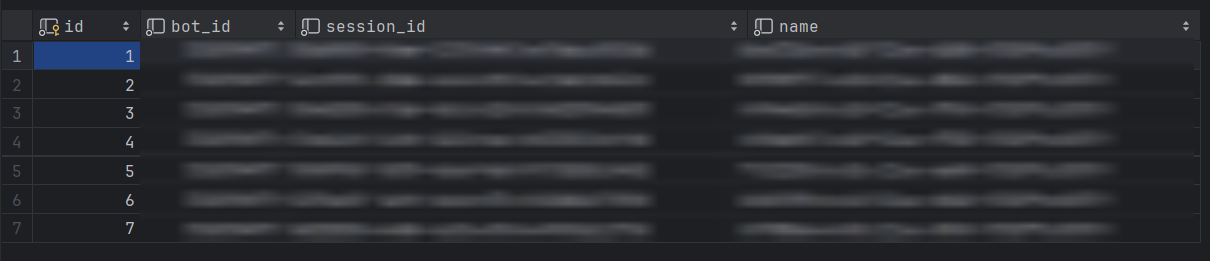
- peewee - ORM for convenient work with databases. In our case, it will be SQLite
- pyTelegramBotAPI - a convenient and simple library for working with Telegram API.
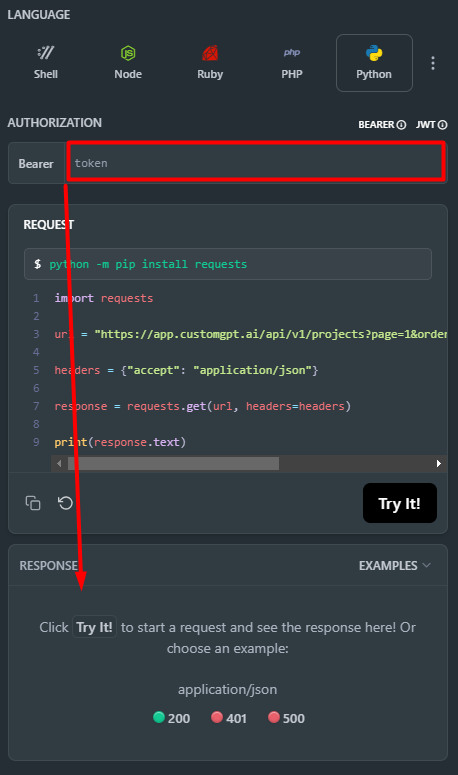
Before you start, you need to get the ID of the project in which you will work with the bot. This can be done using the API.
Enter your API token, run the command, and you will receive a response with a list of all projects and information on them, there you will find the ID of the project you need.
Next, knowing this, you can start writing code for a Telegram bot.
import telebot
from telebot import types
import requests
import peewee
from uuid import uuid1

DB = peewee.SqliteDatabase('bot_database.db')
TELEGRAM_BOT = telebot.TeleBot('YOUR BOT API KEY', parse_mode=None)
API_ENDPOINT = 'https://app.customgpt.ai/api/v1/'
API_TOKEN = 'aaaaaaaaaa'
PROJECT_ID = 000000 # Your Custom GPT project ID

headers = {
    'accept': 'application/json',
    'Content-type': 'application/json',
    'Authorization': 'Bearer ' + API_TOKEN
}


class Sessions(peewee.Model):
    bot_id = peewee.IntegerField()
    session_id = peewee.CharField()
    name = peewee.CharField()

    class Meta:
        database = DB


# Connect to the database and crete tables. Need to use only once.
# DB.connect()
# DB.create_tables([Sessions])


class Project:
    def __init__(self, id):
        self.id = id


def conversation_constructor(user_id, session_name):
    resp = requests.post(API_ENDPOINT + f'projects/{PROJECT_ID}/conversations', json={"name": session_name},
                         headers=headers).json()
    return Sessions.create(name=session_name, session_id=resp['data']['session_id'], bot_id=user_id)


def send_message(text, session_id):
    resp = requests.post(
        API_ENDPOINT + f'projects/{PROJECT_ID}/conversations/{session_id}/messages',
        json={"response_source": "own_content",
              "prompt": f"{text}", },
        headers=headers).json()
    print(f"[User query]: {resp['data']['user_query']}\n[GPT response]: {resp['data']['openai_response']}")
    return {'user_query': resp['data']['user_query'], 'gpt_response': resp['data']['openai_response']}


@TELEGRAM_BOT.message_handler(commands=['start'])
def send_welcome(message):
    chats = []
    markup = types.ReplyKeyboardMarkup()
    chats.append(types.KeyboardButton('/create_new_session'))
    for item in Sessions.select().where(Sessions.bot_id == message.from_user.id):
        chats.append(types.KeyboardButton(item.session_id))
    markup.add(*chats)
    TELEGRAM_BOT.reply_to(message,
                          'Hello there! You have to create a new chat session using the command /create_new_session',
                          reply_markup=markup)


@TELEGRAM_BOT.message_handler(commands=['create_new_session'])
def create_session(message):
    name = str(uuid1())
    conversation_constructor(message.from_user.id, name)
    TELEGRAM_BOT.reply_to(message, f'New session {name}')


@TELEGRAM_BOT.message_handler(content_types=['text'])
def send_message(msg):
    session = Sessions.select().where(Sessions.bot_id == msg.from_user.id).order_by(Sessions.id.desc()).get()
    resp = requests.post(
        API_ENDPOINT + f'projects/{PROJECT_ID}/conversations/{session.session_id}/messages',
        json={"response_source": "own_content",
              "prompt": f"{msg.text}", },
        headers=headers).json()
    print(resp)
    TELEGRAM_BOT.reply_to(msg, f'Session: {session.name}\n{resp['data']['openai_response']}')


if __name__ == '__main__':
    TELEGRAM_BOT.infinity_polling()
Of course, you need to remember that this bot does not yet give the ability to navigate through the sessions, only displays all you created through this Telegram. I think it won't be a problem to make such functionality if needed. As result:
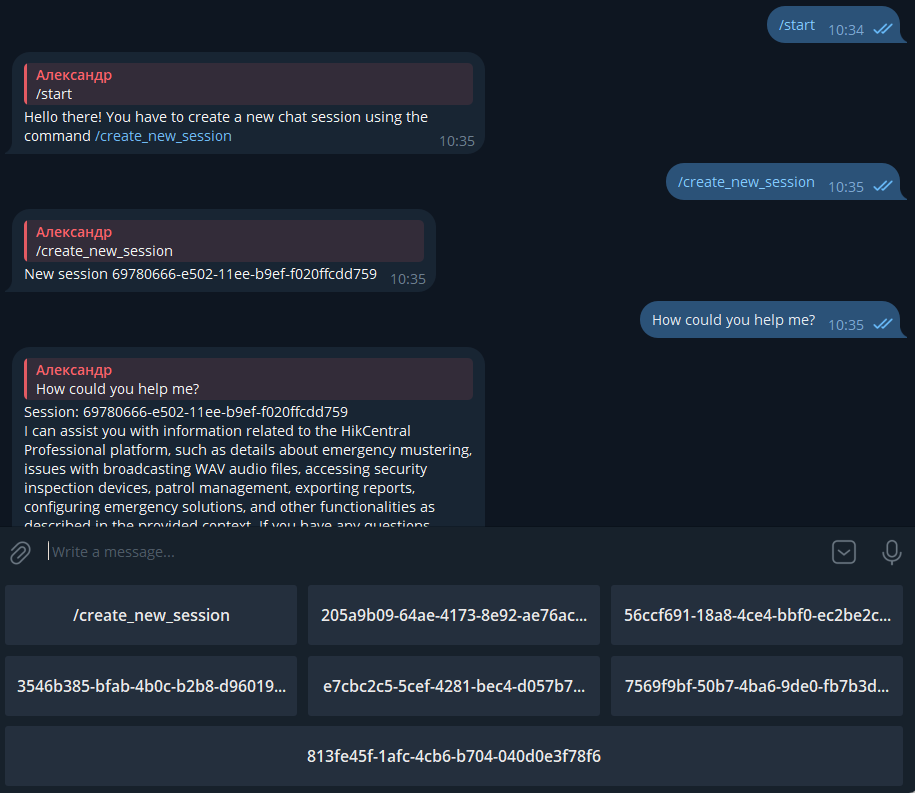
You can just take the bot and copy it. Insert your data and work with it. Here will be a part for those who need a description of the code👌
headers = {
    'accept': 'application/json',
    'Content-type': 'application/json',
    'Authorization': 'Bearer ' + API_TOKEN
}
class Sessions(peewee.Model):
    bot_id = peewee.IntegerField()
    session_id = peewee.CharField()
    name = peewee.CharField()

    class Meta:
        database = DB


# Connect to the database and crete tables. Need to use only once.
# DB.connect()
# DB.create_tables([Sessions])
def conversation_constructor(user_id, session_name):
    resp = requests.post(API_ENDPOINT + f'projects/{PROJECT_ID}/conversations', json={"name": session_name},
                         headers=headers).json()
    return Sessions.create(name=session_name, session_id=resp['data']['session_id'], bot_id=user_id)


def send_message(text, session_id):
    resp = requests.post(
        API_ENDPOINT + f'projects/{PROJECT_ID}/conversations/{session_id}/messages',
        json={"response_source": "own_content",
              "prompt": f"{text}", },
        headers=headers).json()
    print(f"[User query]: {resp['data']['user_query']}\n[GPT response]: {resp['data']['openai_response']}")
    return {'user_query': resp['data']['user_query'], 'gpt_response': resp['data']['openai_response']}
@TELEGRAM_BOT.message_handler(commands=['start'])
def send_welcome(message):
    chats = []
    markup = types.ReplyKeyboardMarkup()
    chats.append(types.KeyboardButton('/create_new_session'))
    for item in Sessions.select().where(Sessions.bot_id == message.from_user.id):
        chats.append(types.KeyboardButton(item.session_id))
    markup.add(*chats)
    TELEGRAM_BOT.reply_to(message,
                          'Hello there! You have to create a new chat session using the command /create_new_session',
                          reply_markup=markup)
@TELEGRAM_BOT.message_handler(commands=['create_new_session'])
def create_session(message):
    name = str(uuid1())
    conversation_constructor(message.from_user.id, name)
    TELEGRAM_BOT.reply_to(message, f'New session {name}')
@TELEGRAM_BOT.message_handler(content_types=['text'])
def send_message(msg):
    session = Sessions.select().where(Sessions.bot_id == msg.from_user.id).order_by(Sessions.id.desc()).get()
    resp = requests.post(
        API_ENDPOINT + f'projects/{PROJECT_ID}/conversations/{session.session_id}/messages',
        json={"response_source": "own_content",
              "prompt": f"{msg.text}", },
        headers=headers).json()
    print(resp)
    TELEGRAM_BOT.reply_to(msg, f'Session: {session.name}\n{resp['data']['openai_response']}')