Django-CMS #3 PART
Alex Blashchuk | Dec. 12, 2023 | Category: DJANGO
Well, we’ve already discussed how to create a custom template, how to add placeholders and how to add text to your page. Now, we are going to look through the process of integration of a new or already existing application to the Django-cms project.
Look at the picture below.
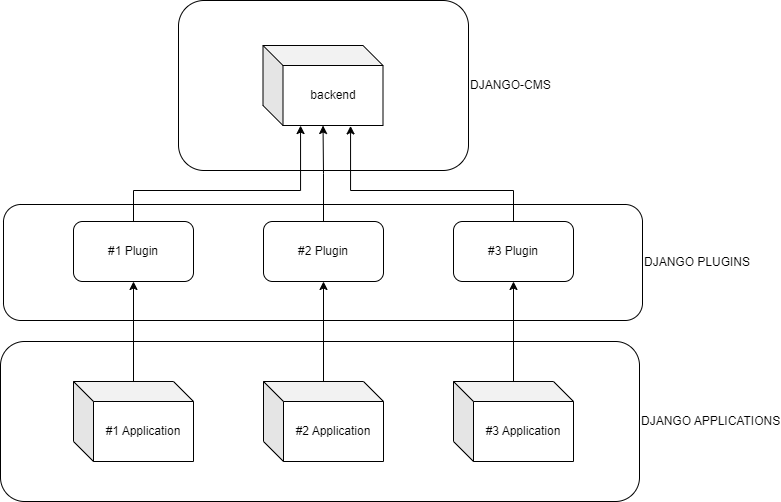
Here we have the DJANGO-CMS with backend. The application with the settings.py and all the templates. Next, we have the DJANGO APPLICATIONS section, with all the applications we want to add to the project. It may be a main page, personal cabinets or any other external logic we need. What do we have to do to add applications to the project? How do we add applications to the project? In simple Django, it's enough to include the application in the APPLICATION_LIST in the settings.py. However, in Django-cms we have to use a plugin for each Django application, the DJANGO PLUGINS section.
For example, we want to add a blog page to our project. I want a full page with a full text and all the content.
Create a Django application by entering the command into the command line 'python manage.py createapp blog'. Add blog to the end of the APPLICATION_LIST. Add the blog url to the urls.py in the backend directory (before the cms.ruls). Create a model: Blog.
class Blog(models.Model):
    title = models.CharField(max_length=128)
    text = models.TextField()
    categories = models.ManyToManyField(Category)

    def __str__(self):
        return self.title
In some sense, a plugin is similar to an application in Django. Just enter “python manage.py createapp blog_cms_integration” in the command line and let’s go. Add blog_cms_integration to the end of the APPLICATION_LIST, it should look like:
INSTALLED_APPS = [
    …,
    'blog_cms_integration',
    'blog',
]
In the models.py of blog_cms_integration add next:
class BlogPluginModel(CMSPlugin):
    blog = models.ForeignKey(Blog, on_delete=models.CASCADE)

    def __str__(self):
        return self.blog.title
Next, create a new file “cms_pluigins.py” in the blog_cms_integration folder. The plugin class is responsible for providing Dango CMS with the necessary information to render your plugin.
For our plugin, we’re going to write the following plugin class:
@plugin_pool.register_plugin
class BlogPluginPublisher(CMSPluginBase):
    model = BlogPluginModel
    module = _('Blogs')
    name = _('Blog Plugin')
    render_template = 'blog_cms_integration/blog_plugin.html'

    def render(self, context, instance, placeholder):
        context.update({'instance': instance})
        return context
module — is the section in the plugin list in the admin page
name — is the name of the plugin in the plugin list
render_template — is the HTML template of the plugin
In the blog_cms_integration/templates/blog_cms_integration create a HTML file “blog_plugin.html”:
<h1>{{ instance.blog.title }}</h1>

<p>{{ instance.blog.text }}</p>
Add the Blog model to the admin site in the blog/admin.py.
from django.contrib import admin
from .models import Blog, Category


@admin.register(Blog)
class BlogAdmin(admin.ModelAdmin):
    list_display = ['title']
Now you can restart the runserver (required because you added the new cms_plugins.py file), and visit http://localhost:8000/admin/.

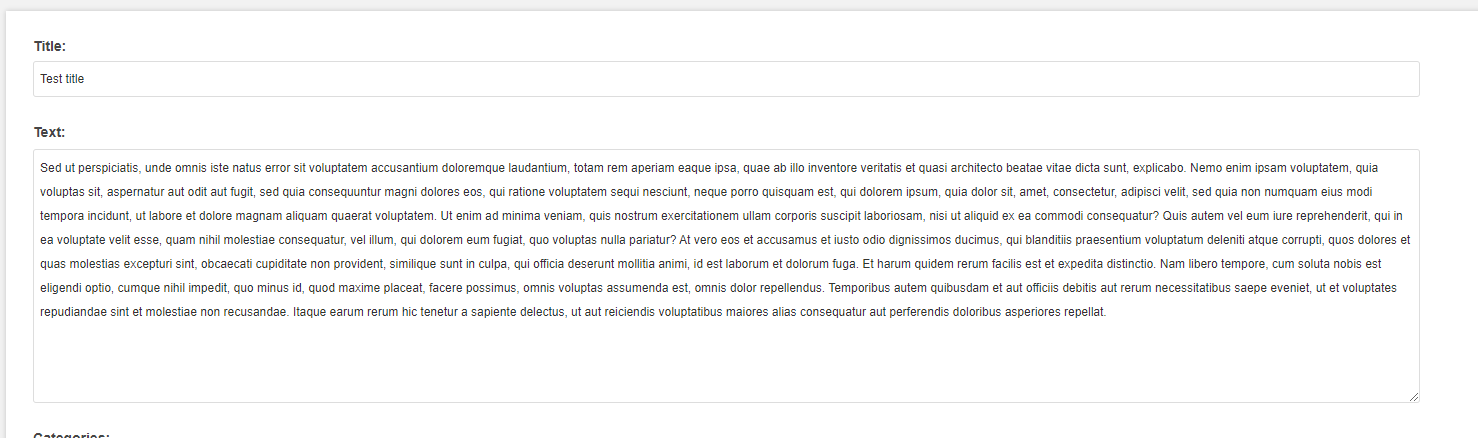
Open “Blogs” and create a new blog entry.
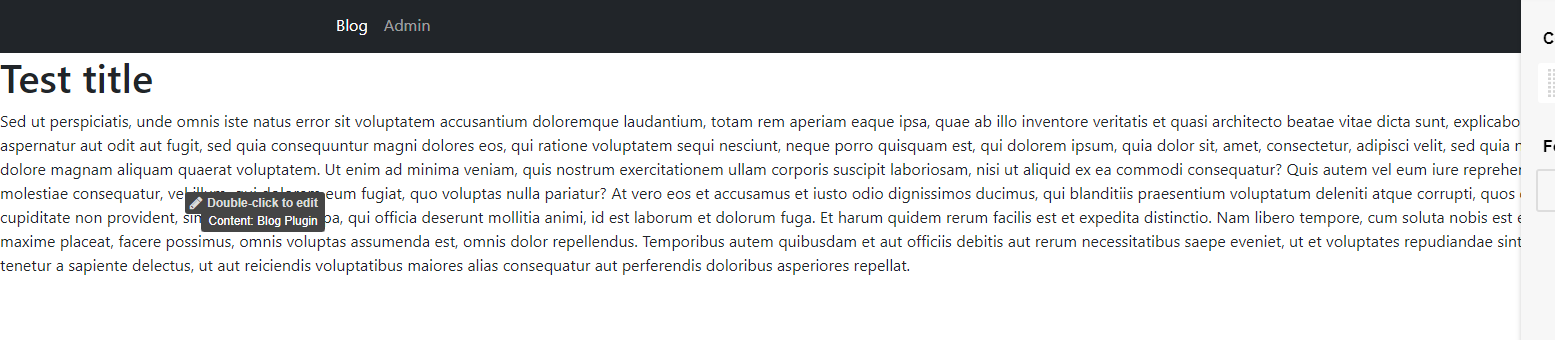
Navigate to the http://localhost:8000/ and let’s add a Blog Plugin.
 You can now drop the Blog Plugin to any placeholder on any page, similar to adding any other plugin.
Now you know how to create your own Django-CMS project, change templates of your website and integrate applications you need to the Django-CMS.