Django-CMS #2 PART
Alex Blashchuk | Dec. 1, 2023 | Category: DJANGO
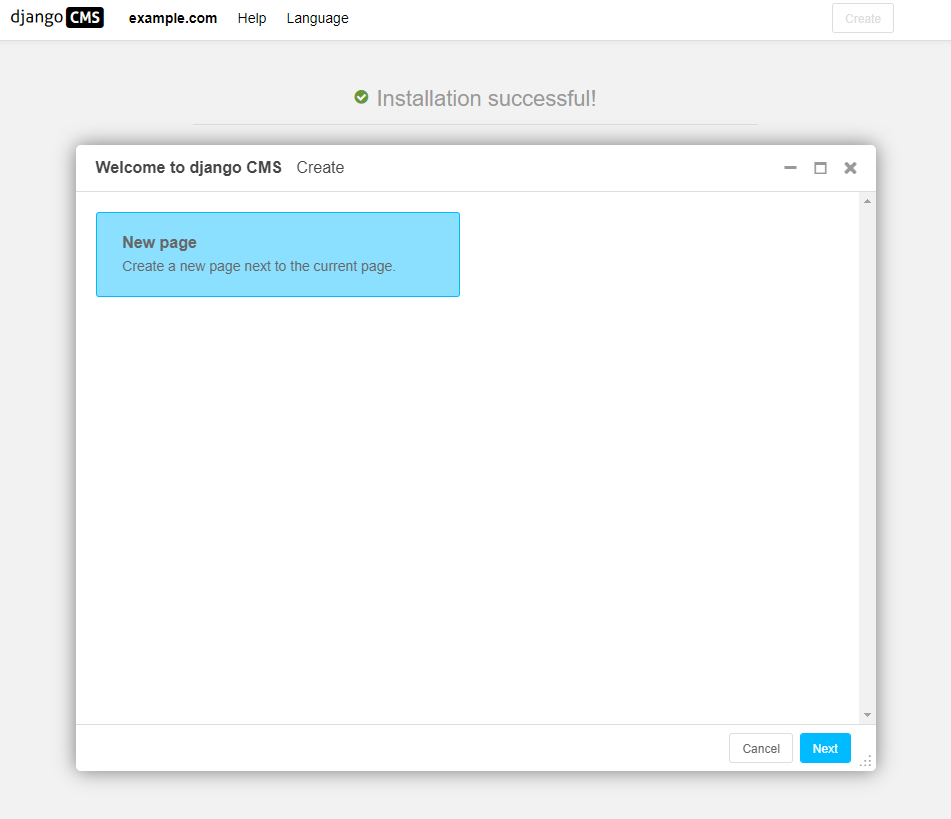
Let’s create our first page. Press New Page and select Next.
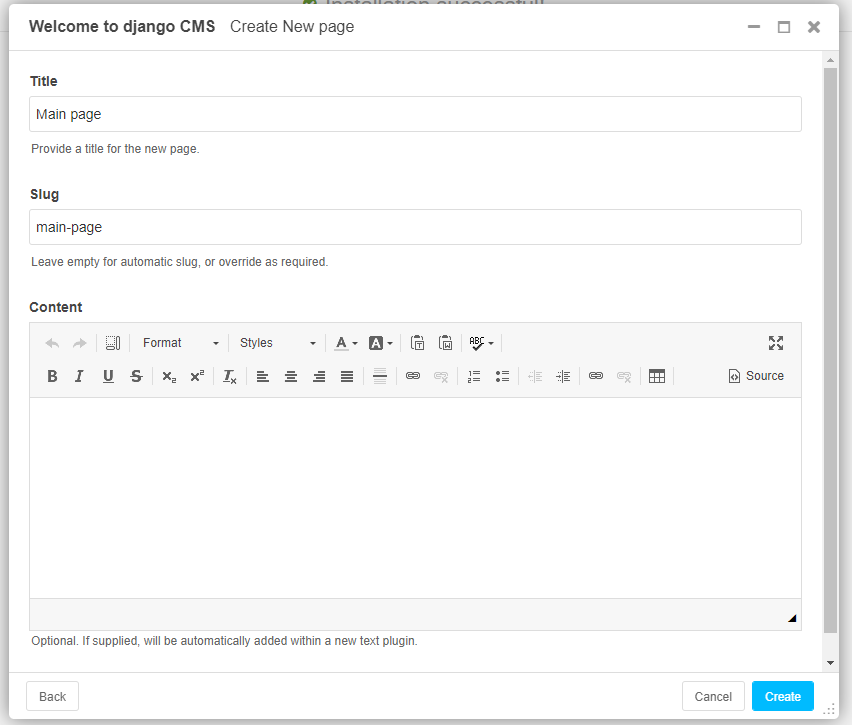
After selecting Next, you will add in your title and some basic text content for the new page (optional), click Create.
The page we've just created is a draft and needs to be published once you finish. As an editor, only you can see and edit your drafts, other visitors to your site will only see your published pages. Press “Publish page now.”
You can check pages on the admin page. Navigate http://127.0.0.1:8000 and open the “Pages” tab, there you will see:

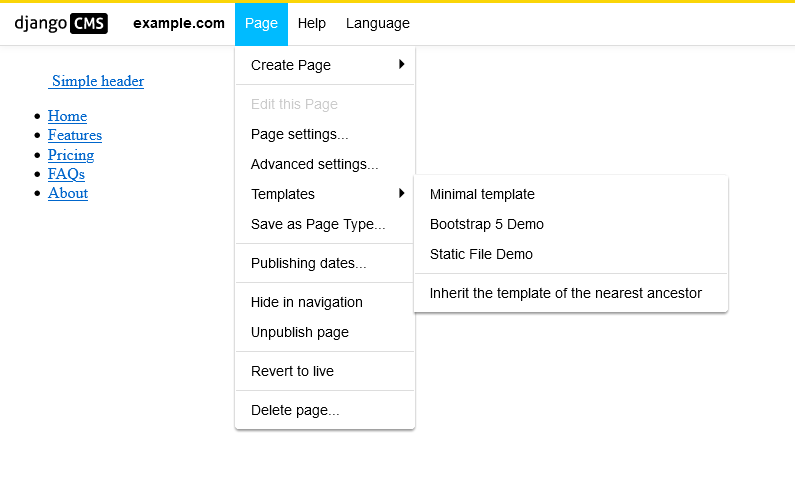
Django-cms has pre-installed templates. The Minimal template is used by default. It’s a simple HTML page which represents all content. Django-cms also has two another template: the Bootstrap 5 Demo and the Static File Demo. You can switch template in Page -> Templates -> choose a template
We can add custom template to the system if we want. In the settings.py file we will find a CMS_TEMPLATES variable which contains a list of tuples (‘template_file_name.html’, ‘Menu item name’) of templates you can select for a page. All templates defined in CMS_TEMPLATES must contain at least the js and css sekizai namespaces (I will show you later).
CMS_TEMPLATES = [
    # a minimal template to get started with
    ('minimal.html', 'Minimal template'),

    # optional templates that extend base.html, to be used with Bootstrap 5
    ('bootstrap5.html', 'Bootstrap 5 Demo'),

    # serving static files with whitenoise demo
    ('whitenoise-static-files-demo.html', 'Static File Demo'),
]
It will be simpler to explain using “minimal.html”. Open backend->templates->menu->minimal.html
{% load cms_tags sekizai_tags %}
<html>
    <head>
        <title>{% page_attribute "page_title" %}</title>
        {% render_block "css" %}
    </head>
    <body>
        {% cms_toolbar %}
        {% placeholder "Content" %}
        {% render_block "js" %}
    </body>
</html>
Here you can see “sekizai_tags” and “js” namespaces.“minimal.html” contains single “Content” placeholder. Placeholders are an easy way to define sections in an HTML template that will be filled with content from the database when the page is rendered. This content is edited using django CMS’s frontend editing mechanism, using Django template tags.
Add a new placeholder to “minimal.html”, {% placeholder "feature" %} inside the {% block content %} section.
<body>
    {% cms_toolbar %}
    {% placeholder "Content" %}
    {% placeholder "feature" %}
    {% render_block "js" %}
</body>
If you switch to Structure mode (button in the upper-right corner of the page), you’ll see the new placeholders available for use.
You also can add “statis_placeholder” if you want to add footer or header to your page's manually. For example, if you want to have a footer which you could change at any time, you must add:
<footer>
   {% static_placeholder 'footer' %}
</footer>
Save the template and return to your browser. Refresh any page in Structure mode, and you’ll see the new static placeholder.

Now, let’s return to our project. We will be working with “bootstrap5.html”, as it already have navigation bar, bootstrap styling, and it looks much better than “minimal.html” 😁. On the main page, open “Edit” mode, next Page->Templates->Bootstrap 5 Demo and publish page changes. Now we have the navigation bar with one link to the main page and the main page content. Looks nice, doesn’t it?😉

We are able to add placeholders to the “bootstrap5.html” too. Navigate to the file and let’s look what we have here:
{% extends "base.html" %}{% load cms_tags menu_tags %}
{% block base_css %}
    <link href="https://cdn.jsdelivr.net/npm/bootstrap@5.2.1/dist/css/bootstrap.min.css" rel="stylesheet" integrity="sha384-iYQeCzEYFbKjA/T2uDLTpkwGzCiq6soy8tYaI1GyVh/UjpbCx/TYkiZhlZB6+fzT" crossorigin="anonymous"/>
{% endblock %}
{% block base_js %}
    <script src="https://cdn.jsdelivr.net/npm/bootstrap@5.2.1/dist/js/bootstrap.bundle.min.js" integrity="sha384-u1OknCvxWvY5kfmNBILK2hRnQC3Pr17a+RTT6rIHI7NnikvbZlHgTPOOmMi466C8" crossorigin="anonymous"></script>
{% endblock %}
{% block navbar %}
    <nav class="navbar {% block navbar_options %}navbar-expand-lg navbar-dark bg-dark{% endblock %}">
        <div class="container">
            <a class="navbar-brand" href="/">{% block brand %}{% endblock %}</a>
            <button class="navbar-toggler" type="button" data-bs-toggle="collapse" data-bs-target="#navbarSupportedContent" aria-controls="navbarSupportedContent" aria-expanded="false" aria-label="Toggle navigation">
                <span class="navbar-toggler-icon"></span>
            </button>
            <div class="collapse navbar-collapse" id="navbarSupportedContent">
                <ul class="navbar-nav me-auto mb-2 mb-lg-0">{% block menubar %}{% show_menu 0 100 0 100 'menu/menu.html' %}{% endblock %}</ul>
                {% block searchbar %}{% endblock %}
            </div>
        </div>
    </nav>
{% endblock %}
There is extending to the “base.html” file in the same “menu” directory in the project. We add css styles and js scripts to the base.html and customized navigation bar. Base.html is the place where we can add placeholders, so let do this. Navigate to the base.html and add placeholder “feature” to block “{% block content %}”.
At last, let’s create our own template HTML file and add to the system and Edit panel. In the backend/templates/ create “my_test_template.html” file. Open the file and add next code:
{% load cms_tags sekizai_tags %}

<!DOCTYPE html>
<html lang="en">
<head>
    <!-- Custom styles for this template -->
    <link href="headers.css" rel="stylesheet">

    <title>{% page_attribute "page_title" %}</title>
    {% render_block "css" %}
</head>
<body>
{% cms_toolbar %}
<header class="d-flex flex-wrap justify-content-center py-3 mb-4 border-bottom">
    <a href="/backend/static" class="d-flex align-items-center mb-3 mb-md-0 me-md-auto text-dark text-decoration-none">
        <svg class="bi me-2" width="40" height="32">
            <use xlink:href="#bootstrap"></use>
        </svg>
        <span class="fs-4">Simple header</span>
    </a>

    <ul class="nav nav-pills">
        <li class="nav-item"><a href="#" class="nav-link active" aria-current="page">Home</a></li>
        <li class="nav-item"><a href="#" class="nav-link">Features</a></li>
        <li class="nav-item"><a href="#" class="nav-link">Pricing</a></li>
        <li class="nav-item"><a href="#" class="nav-link">FAQs</a></li>
        <li class="nav-item"><a href="#" class="nav-link">About</a></li>
    </ul>
</header>
{% render_block "js" %}
</body>
</html>
Then we need to specify the template in the settings.py in the variable CMS_TEMPLATES, like that:
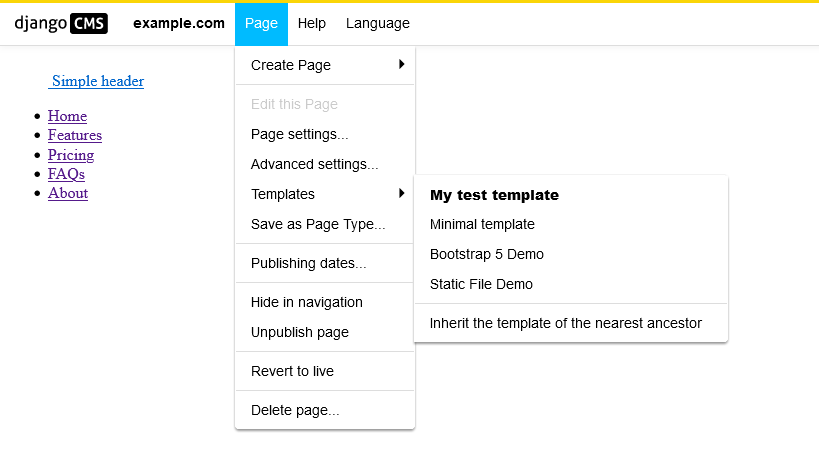
CMS_TEMPLATES = [
    ('my_test_template.html', 'My test template'),
    # a minimal template to get started with
    ('minimal.html', 'Minimal template'),

    # optional templates that extend base.html, to be used with Bootstrap 5
    ('bootstrap5.html', 'Bootstrap 5 Demo'),

    # serving static files with whitenoise demo
    ('whitenoise-static-files-demo.html', 'Static File Demo'),
]
Return to browser, open page in Edit mode and check available templates. You will see our “My test template”. That’s all.